GitHub Pages 에 API 문서 배포하기
소스를 작성하면 테스트 코드와 더불어 API 문서를 만들어 동료나 혹은 다른 개발자가 사용하기 쉽게 도큐먼트를 제공합니다.

여러가지 라이브러리나 솔루션이 있겠지만, PHP 에서 사용할 수 있는 가장 쉬운 방법과 GitHub Pages 에 올릴 수 있는 방법을 소개합니다.
API 문서 만들기
PHP에서 가장 쉽게 사용할 수 있는 라이브러리는 라라벨에서도 사용되는 doctum 입니다. doctum GitHub 레포지토리에서 설치 방법이 자세히 나와있는데요, 요약하자면,
curl -O https://doctum.long-term.support/releases/latest/doctum.phar

mv doctum.phar ~/bin/

chmod +x ~/bin/doctum.phar
chmod로 실행 권한을 주지 않으면 doctum.phar를 실행할 수 없으니 꼭 추가해 주세요.
그리고 프로젝트 루트에 doctum.php 설정 파일을 만들어야 합니다. 이 파일이 없으면 doctum 실행 시 에러가 발생합니다. 아래는 예제입니다.
<?php

use Doctum\Doctum;
use Doctum\RemoteRepository\GitHubRemoteRepository;
use Symfony\Component\Finder\Finder;

$dir = getcwd().'/src';
$iterator = Finder::create()
    ->files()
    ->name('*.php')
    ->exclude('tests')
    ->in($dir);

return new Doctum($iterator, [
    'title' => 'The cable8mm/portone-php API',
    'source_dir' => dirname($dir).'/',
    'remote_repository' => new GitHubRemoteRepository('cable8mm/portone-php', dirname($dir)),
    'footer_link' => [
        'href' => 'https://github.com/cable8mm/portone-php',
        'target' => '_blank',
        'before_text' => 'You can refer',
        'link_text' => 'cable8mm/portone-php', // Required if the href key is set
        'after_text' => 'repository',
    ],
]);
src 폴더의 PHP 파일을 대상으로 하고 tests 폴더는 제외합니다. 프로젝트에 맞게 title과 레포지토리 이름을 바꿔서 사용하세요.
이제 소스의 composer.json 파일에 아래의 내용을 추가합니다.
"scripts": {
    "apidoc": "rm -rf build; rm -rf cache; doctum.phar update doctum.php --output-format=github --no-ansi --no-progress -v;",
    "opendoc": "open build/index.html"
}
이제 composer apidoc 명령어로 API 문서를 만들 수 있고, composer opendoc 명령어로 API 문서를 브라우저로 띄울 수 있게 되었습니다.
GitHub Pages 에 API 문서 배포하기
우선 GitHub Pages 에 필요한 API 문서는 로컬에서 만들어지는 것이 아닙니다. GitHub Actions 로 만듭니다. 개발 머신에 doctum을 설치한 이유는 테스트를 하기 위함입니다.
우선 GitHub 레포지토리에서 GitHub Pages 를 활성화 합니다.
상단에서 Settings을 클릭하고, 좌측 메뉴에서 Pages를 클릭 후 Build and deployment Source 에서 GitHub Actions를 선택하세요.

GitHub 에서의 준비는 끝났습니다. 이제 GitHub Actions 로 doctum 으로 만들어진 API 문서를 GitHub Pages 로 배포하는 액션을 .github/workflows/deploy-to-github-pages.yml 파일로 넣습니다. 배포 시점에 따라 아래 두 가지 중 하나를 선택해서 사용하세요.
main 브랜치에 push 할 때마다 배포하기
name: deploy-to-github-pages

on:
  push:
    branches: ["main"]

permissions:
  contents: read
  pages: write
  id-token: write

# Allow only one concurrent deployment, skipping runs queued between the run in-progress and latest queued.
# However, do NOT cancel in-progress runs as we want to allow these production deployments to complete.
concurrency:
  group: "pages"
  cancel-in-progress: false

jobs:
  deploy:
    environment:
      name: github-pages
      url: $
    runs-on: ubuntu-latest
    steps:
      - name: Checkout
        uses: actions/checkout@v7
      - name: Setup Pages
        uses: actions/configure-pages@v6
      - name: build doctum docs
        uses: sudo-bot/action-doctum@v5
        with:
          config-file: doctum.php
          method: "update"
          # (optional) defaults to '--output-format=github --no-ansi --no-progress -v'
          cli-args: "--output-format=github --no-ansi --no-progress -v"
      - name: Upload artifact
        uses: actions/upload-pages-artifact@v5
        with:
          # Upload entire repository
          path: ./build
      - name: Deploy to GitHub Pages
        id: deployment
        uses: actions/deploy-pages@v5
main 브랜치에 push 할 때마다 doctum.php 설정으로 API 문서를 만들어서 GitHub Pages 에 배포하는 액션입니다. 항상 최신 소스 기준의 API 문서를 유지할 수 있습니다.
Release 를 만들 때만 배포하기
버전을 릴리스할 때만 API 문서를 갱신하고 싶다면 on 부분만 release 로 바꾸면 됩니다. 복사해서 바로 쓸 수 있도록 전체 코드를 적어 둡니다.
name: deploy-to-github-pages

on:
  release:
    types: [released]

permissions:
  contents: read
  pages: write
  id-token: write

# Allow only one concurrent deployment, skipping runs queued between the run in-progress and latest queued.
# However, do NOT cancel in-progress runs as we want to allow these production deployments to complete.
concurrency:
  group: "pages"
  cancel-in-progress: false

jobs:
  deploy:
    environment:
      name: github-pages
      url: $
    runs-on: ubuntu-latest
    steps:
      - name: Checkout
        uses: actions/checkout@v7
      - name: Setup Pages
        uses: actions/configure-pages@v6
      - name: build doctum docs
        uses: sudo-bot/action-doctum@v5
        with:
          config-file: doctum.php
          method: "update"
          # (optional) defaults to '--output-format=github --no-ansi --no-progress -v'
          cli-args: "--output-format=github --no-ansi --no-progress -v"
      - name: Upload artifact
        uses: actions/upload-pages-artifact@v5
        with:
          # Upload entire repository
          path: ./build
      - name: Deploy to GitHub Pages
        id: deployment
        uses: actions/deploy-pages@v5
Release 를 만들면 API 문서를 만들어서 GitHub Pages 에 배포하는 액션입니다.
Release 로 배포할 때 필요한 설정
Release 는 브랜치가 아니라 태그를 기준으로 실행되기 때문에, 설정을 바꾸지 않으면 배포가 실패합니다. 실제로 아래와 같은 에러가 발생합니다.
Tag "v0.3.1" is not allowed to deploy to github-pages due to environment protection rules.
github-pages environment 가 기본적으로 기본 브랜치에서의 배포만 허용하기 때문입니다. 다음 순서로 태그 규칙을 추가해 주세요. Pages 메뉴가 아니라 Environments 메뉴에 있다는 점에 주의하세요.
- 레포지토리 상단
Settings를 클릭하고, 좌측 메뉴에서Pages가 아닌Environments를 클릭합니다. github-pages를 클릭합니다.Deployment branches and tags드롭다운에서Selected branches and tags를 선택합니다.Add deployment branch or tag rule을 클릭하고 Ref type 은Tag, 이름 패턴은v*로 추가합니다. 기존main규칙은 그대로 둡니다.- 실패한 액션에서
Re-run jobs를 눌러 다시 배포합니다.
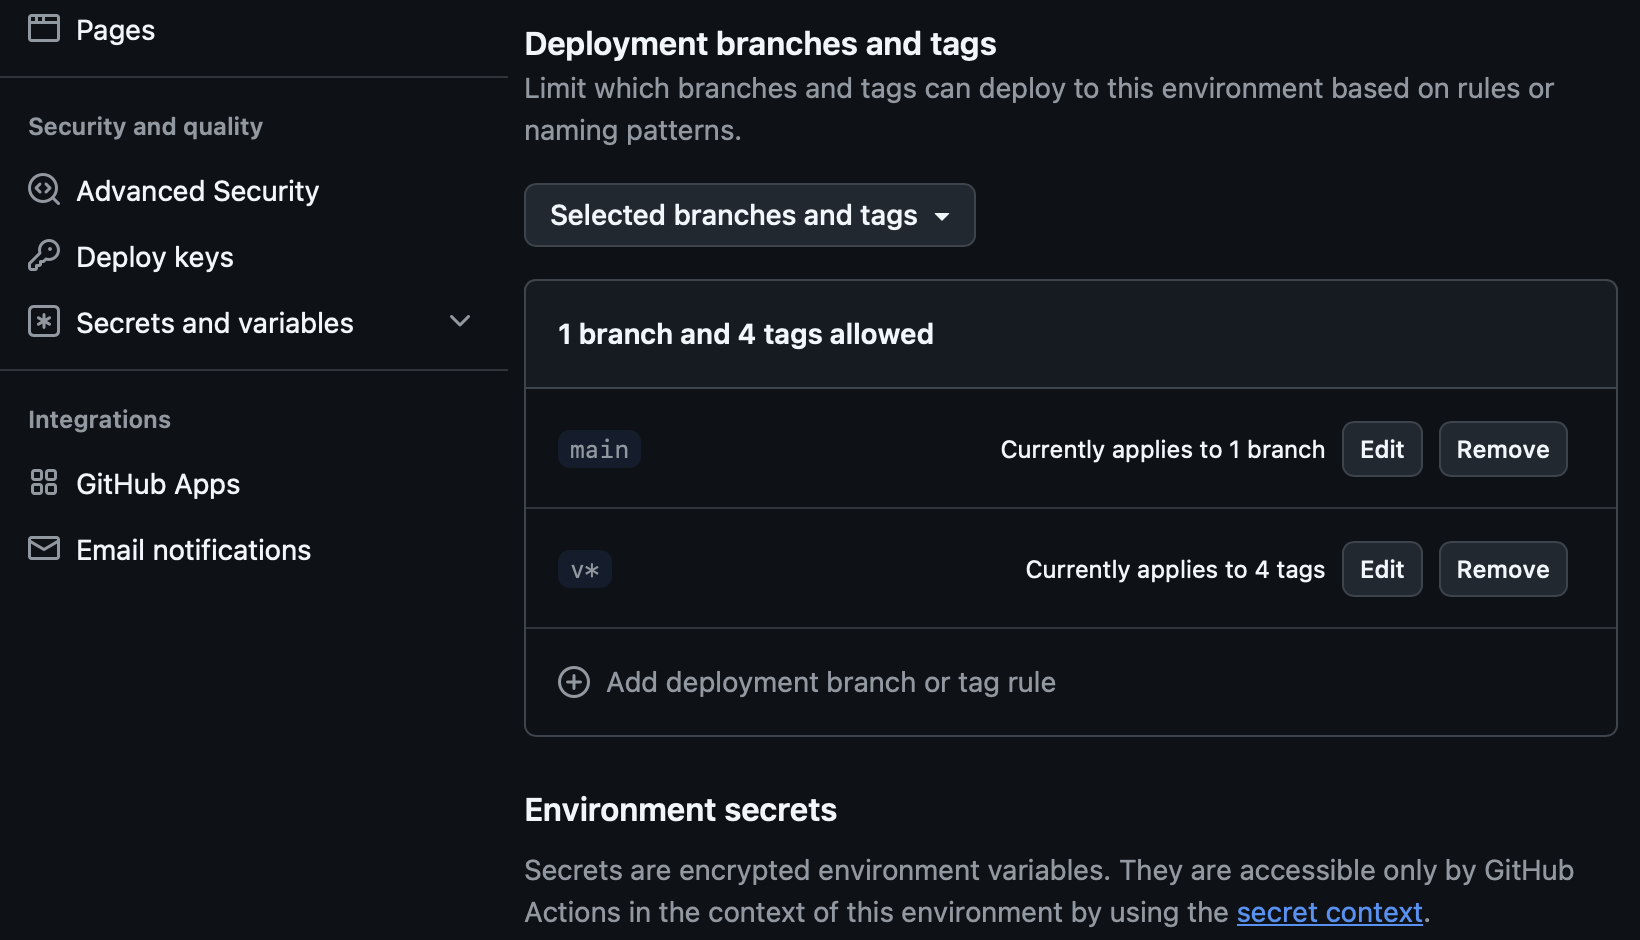
위처럼 main 브랜치와 v* 태그가 모두 허용되면 두 방식 모두 사용할 수 있습니다. 태그 이름이 v 로 시작하지 않는다면 사용하는 태그 규칙에 맞게 패턴을 바꿔 주세요. 비공개 레포지토리는 GitHub Pro 또는 Team 요금제에서만 이 설정을 사용할 수 있습니다.
정리
두 방식 모두 로컬에서 만든 build 폴더를 올리는 것이 아니라, 액션 안에서 sudo-bot/action-doctum 으로 새로 만들어서 올립니다. GitHub Pages 에 배포하려면 pages: write 와 id-token: write 권한이 필요하니 permissions 를 빼먹지 마세요. 두 파일을 동시에 넣으면 배포가 중복되니 하나만 사용하세요.
이런 방법으로 저의 오픈소스 프로젝트인 The Xeed 에서는 API 문서 도메인으로 API 문서를 제공하고 있으며, 레포지토리 우측 website 섹션에 API 주소를 표기해 놨습니다.